

What is Exposure Management?

Cloud adoption, microservices, and remote work keep adding new endpoints, identities, and data stores. Teams ship quickly, spin up short-lived resources, and connect third-party APIs. At this pace, errors quickly slip through: permissive roles, exposed buckets, default configs, leaked secrets, and shadow apps. The attack surface changes faster than manual reviews can follow.
This also means the risk faced by teams isn’t just about software flaws. Traditional vulnerability management targets CVEs and patch SLAs, but it misses configuration drift, excessive privileges, data exposures, and broken controls. Exposure Management (EM) addresses that wider set of openings. It builds a consistent view across assets, identities, configurations, and data, then helps teams decide which gaps matter most.
In this article we define exposure management, outline core components, compare it with related practices, connect it to business value, walk a simple lifecycle, review key tools, share best practices, and call out challenges to plan for. The goal isn’t just more findings, it’s fewer viable attack paths.
What is Exposure Management?
Exposure management is the ongoing discipline of finding where systems can be harmed and closing those openings before they become incidents. It looks beyond software flaws to include configuration mistakes, excessive privileges, data exposures, weak or missing controls, and shadow IT. The aim is to map the real paths an attacker could take from entry to business impact, not to tally scanner findings.
A frequent point of confusion is how Exposure Management (EM) relates to Continuous Threat Exposure Management (CTEM). They work together but are not the same. Exposure Management is the day-to-day capability set that keeps visibility current, judges risk with context, and drives fixes. CTEM is the framework that organizes this work into scoped, time-boxed cycles aligned to business services, with reviews that prove results. In short, EM is what you do. CTEM is how you structure it so it stays aligned and measurable.
Both ideas reinforce a modern security mindset: view systems as a connected whole rather than silos. A unified view across assets, identities, data, and controls reveals relationships that cross boundaries, which is where real attack paths tend to hide.
Core Components of Exposure Management
Each step of exposure management has a distinct goal: visibility, mapping, risk scoring, prioritization, remediation, and verification. Taken together, they turn exposure work into a focused loop that reduces viable attack paths and shortens the time from detection to durable fix.
Step 1: Discover Exposed Assets
This step builds a current inventory of what could be at risk: internet-reachable services, sensitive data stores, identities, and third-party connections. Discovery pulls from cloud APIs, SaaS org data, container registries, DNS, and certificates to find what exists and who owns it. The result is a de-duplicated catalog with owners, criticality, and basic exposure attributes so teams know what they are protecting and where to look first.
Step 2: Map the Attack Surface
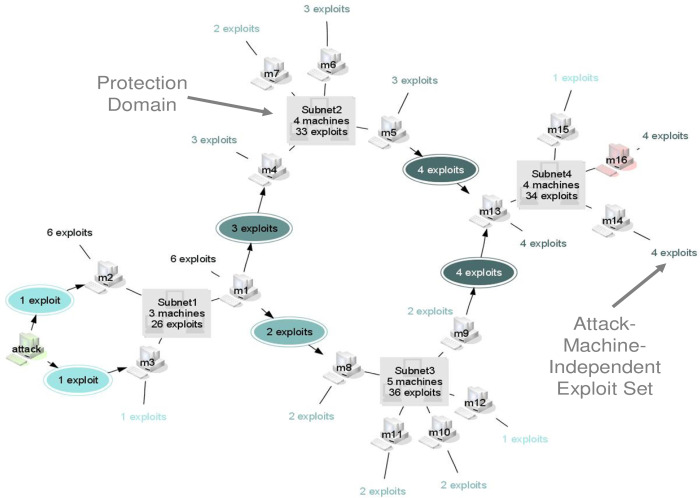
Here you model how assets, identities, networks, and controls connect. The data expresses naturally as a graph, so an attack graph can be helpful here. Nodes represent entities such as services, roles, keys, datasets, and control points. Edges capture reachability, trust, and data flows. With attack path analysis, you can trace real paths an attacker could follow from entry to business impact, see which controls sit on those paths, and identify choke points where a single change removes multiple routes. The goal is to see real paths an attacker could follow from entry to business impact. Mapping turns raw inventory into relationships, reachability, and trust boundaries, then overlays control coverage. This reveals choke points and shadow links, showing where a single change can remove multiple routes at once.
Step 3: Score Exposure Risk
Not all exposures carry the same weight. Risk scoring estimates likelihood and impact using business context such as data sensitivity, asset criticality, exploit signals, reachability, privilege level, and potential blast radius. The outcome is an explainable score and short rationale for each item, so stakeholders understand why something matters and can compare items across teams.
Step 4: Prioritize Exposures
Prioritization converts many findings into a small, actionable list. It removes duplicates, groups items by root cause, and selects fixes that collapse full paths rather than single points. The result is a ranked backlog with owners and timelines, sized to fit delivery schedules, and tied to expected risk reduction per change.
Step 5: Apply Targeted Fixes
This step makes specific changes that close attack paths with minimal disruption. Examples include tightening privileges, hardening configurations, adding missing controls, or making small architecture adjustments. Success looks like verified fixes that address multiple exposures at once, a high first-pass success rate, and time to remediate trending down.
Step 6: Monitor and Recheck
Environments change, so the picture must stay fresh and relevant. Continuous discovery refreshes inventory and updates the attack graph as relationships shift. Drift detection flags new exposures or control changes. After fixes land, run reachability analysis on the attack graph to confirm there is no path from likely entry points to sensitive targets. Automate these checks on a schedule and in CI/CD so regressions are caught early. When a closed path reappears, reopen it with context for fast handling. The outcome is verified, durable fixes and a steady trend toward fewer viable attack paths.
Exposure Management vs Related Practices
Traditional approaches like vulnerability management (VM) struggle to keep up with today’s fast-moving landscape. Exposure management takes a more holistic view, looking beyond software flaws to include misconfigurations, excessive privileges, exposed data, control gaps, and third-party risks, then aligns work with business goals so fixes have tangible impacts. Most teams already speak the language of vulnerability management, so comparing the two gives a clear frame of reference. There will be overlaps because VM fits inside EM, but the comparison helps define scope and set expectations.
The Business Value of Exposure Management
Exposure management focuses effort where it matters so incidents drop, releases stay safe, and customers stay confident. Let’s take a look at how it turns security work into outcomes the business can actually feel.
Risk Reduction and Service Resilience
Exposure management lowers real risk where it affects uptime and customers. By finding misconfigurations, excessive privileges, exposed data, and weak controls across systems, it removes the conditions that turn small slips into incidents. Work is scoped to services, so changes protect the transactions and datasets that matter most.
Speed with Verification and Prevention
Speed only counts if fixes hold. Exposure management pairs fast routing and playbooks with verification, using policy checks and reachability analysis after changes to prove the issue is gone. It also means that risky changes are caught earlier in the pipeline, stopping problems before they ship.
Operational Efficiency and Alignment
A unified view breaks down silos. Exposure management pulls assets, identities, data, and control signals into one place so platform, app, identity, and data teams are acting from the same picture. Automation does the heavy lifting for smarter prioritization and faster remediation by de-duplicating findings, grouping by root cause, enriching with ownership and criticality, and routing work to the right team. Alert fatigue drops because the system filters noise and highlights high-impact issues first, so engineers spend time on changes that meaningfully reduce risk.
Audit-Ready Proof of Effectiveness
Exposure management captures evidence as part of everyday work. Each item records what changed, why that change was selected, how the team validated the result, and a later recheck to confirm it stayed fixed. Since each fix is tied to a specific service, data class, and risk target, it makes the impact clear to service owners and product leaders.
Exposure Management Lifecycle
Most organizations run the exposure management lifecycle through CTEM, an operational framework that turns the work into repeatable cycles. CTEM outlines five stages: Scoping, Discovery, Prioritization, Validation, and Mobilization.
- Scoping: Define the business service, the risks to tackle this cycle, and the in-scope boundaries so work aligns with priorities and owners.
- Discovery: Build a factual picture inside that scope by joining assets, identities, configs, controls, and findings into a single view of exposures.
- Prioritization: Cut the list to a small, actionable set of fixes by ranking items with context such as impact, exploitability, reachability, and control gaps.
- Validation: Prove the top items are real in your environment and confirm the planned changes break the path an attacker would use.
- Mobilization: Route validated items to the right teams, deliver changes through normal workflows, and verify outcomes with evidence.
You’ll notice that the core components of EM greatly overlap with the stages of CTEM. This is because CTEM is the modern day approach to EM, incorporating real-time threat analytics, prioritization and validation. This ensures that EM focuses on the fixes that have visible impact and align with business goals.

Key Technologies & Tools in Exposure Management
There are many tools involved in exposure management, so this section keeps it high level, even though each one can really be a deep dive of its own. The capabilities of these toolings also have a tendency to overlap, so understanding what best suits the needs of your organization is important when deciding your own approach to exposure management.
Attack Surface Management (ASM)
An inside-out and outside-in view of owned and internet-reachable assets, including shadow IT, mapped to owners. The result is a current, trusted inventory that shows what exists and what is exposed.
Posture Tools
Continuous evaluation of cloud, application, identity, and data settings against policy and best practices. The output is clear, actionable fixes for misconfigurations and over-privilege that cut noisy alerts.
Cyber Asset Attack Surface Management (CAASM)
A reconciled asset view built from multiple systems with owners and rich metadata. Blind spots shrink and remediation routing improves.
Security Information and Event Management (SIEM)
SIEM allows for centralized log collection and correlation for threat detection and investigation. Active issues surface faster and lessons feed back into prevention and fixes.
Graph Analytics
A relationship model of assets, identities, data, configurations, and controls that supports reachability analysis. Choke points become visible and post-fix checks confirm no viable route remains.
Control Validation
Evidence-oriented testing of control effectiveness and exploitability. Confidence rises through proof before and after changes.
Best Practices for Effective Exposure Management
Automate Smartly
Decide what should run on autopilot and what needs human judgment. Automate discovery, correlation/deduplication, risk scoring inputs, and post-fix checks. Keep humans in the loop for risk trade-offs, architecture changes, exceptions, and anything that affects customer experience.
Simulate Attacker Behavior
Test what matters, not hypotheticals. Use safe attack simulation and relationship/reachability analysis to mirror real techniques and routes. Remediation then targets material threats that an attacker could actually use, not just high-scoring but low-impact findings.
Streamline Processes
Make ownership and handoffs obvious. Define who decides, who fixes, and where the work lives (tickets, repos, CI/CD). Publish lightweight playbooks for common fixes, and train teams so they can make decisions without waiting on security. This cuts lag and keeps queues moving.
Validate and Update
Security isn’t a one-off thing. Fixes should work and keep working. Recheck exposures after changes, track relapse, and review evidence regularly. When patterns shift, update rules and playbooks. Pairing exposure management with frameworks like CTEM allow your security efforts to remain continuous and on top of threats.
Challenges in Exposure Management
Choosing the wrong tools and poorly-defined expectations create their own risks. The sections below call out common pitfalls to watch for so your exposure management stack supports the work instead of getting in the way.
Rapidly Changing Environments
Cloud resources spin up and down, service accounts multiply, and short-lived tokens blur accountability. Keeping a clean, owner-mapped inventory across cloud, SaaS, containers, and machine identities is tough. When the inventory lags, decisions get made on stale data, priorities drift, and “temporary” access quietly widens the attack surface.
Time to Remediation
Many fixes touch multiple teams and layers, so even simple changes slow down. Approvals, scheduling, and fear of breaking critical services stretch the gap between detection and resolution. This can get especially dangerous if playbooks are not well-defined, leaving teams confused about what to prioritize and who should handle it. Backlogs grow, verification lags, and short-lived findings turn into long-lived risk.
Data Privacy & Residency
Centralizing signals can move sensitive data across legal or contractual boundaries, especially in multi-region and SaaS-heavy environments. Ownership and access often fragment across teams and tools, creating shadow copies and unclear custodianship. Moving data introduces lag. ETL jobs, exports, and reviews delay detection and can leave prioritization working with stale context. Third-party integrations and evidence retention add risk, so decide up front what you collect, where it lives, who can see it, and how long you keep it.
Relationship-Aware Analysis
The core questions in exposure management are relational: who can reach what, through which paths, under current configurations. Most security signals already form a graph, but they live in relational tables that require costly joins, or in separate graph stores that need ETL and create duplicate data. Both patterns slow analysis and introduce inconsistencies across tools.
How PuppyGraph Can Help
Exposure management works when you can see relationships, not just lists. Who can reach what, under which permissions, and through which systems. That context turns a pile of findings into a short set of meaningful fixes and lets you prove they hold.

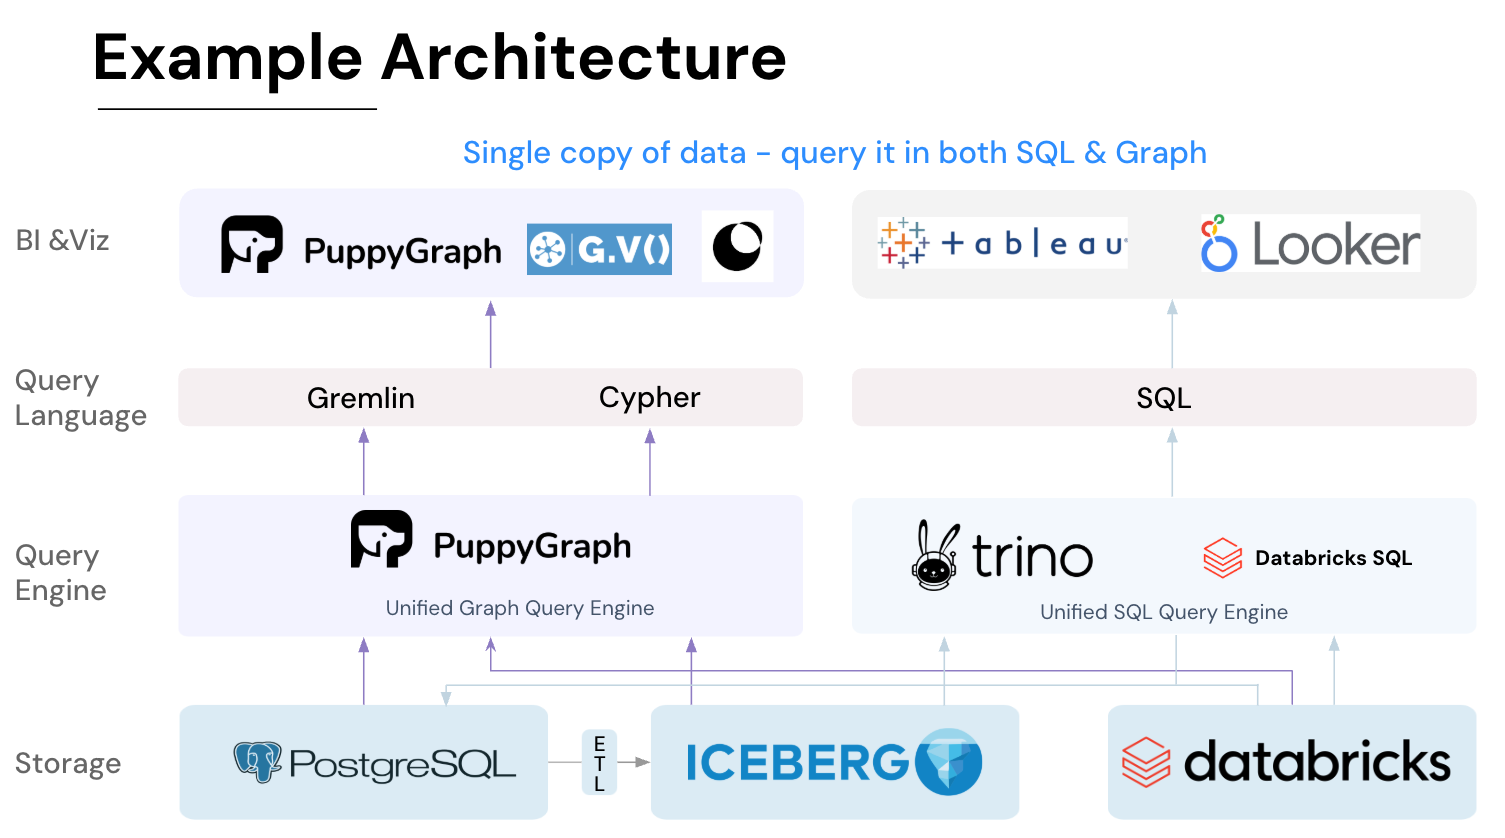
PuppyGraph is the first and only real time, zero-ETL graph query engine in the market, empowering data teams to query existing relational data stores as a unified graph model that can be deployed in under 10 minutes, bypassing traditional graph databases' cost, latency, and maintenance hurdles.
It seamlessly integrates with data lakes like Apache Iceberg, Apache Hudi, and Delta Lake, as well as databases including MySQL, PostgreSQL, and DuckDB, so you can query across multiple sources simultaneously.

PuppyGraph discovers attack paths across your own environment and runs “what-if” tests to confirm that a change truly breaks the route. Because it works on your organization’s actual network and identity relationships, it spots lateral movement patterns that rule-based checks and ML models often miss. And since assets and permissions naturally form a graph, PuppyGraph lets you query those relationships directly, without clunky SQL joins or duplicating data into a separate graph database.
Key PuppyGraph capabilities include:
- Zero ETL: PuppyGraph runs as a query engine on your existing relational databases and lakes. Skip pipeline builds, reduce fragility, and start querying as a graph in minutes.
- No Data Duplication: Query your data in place, eliminating the need to copy large datasets into a separate graph database. This ensures data consistency and leverages existing data access controls.
- Real Time Analysis: By querying live source data, analyses reflect the current state of the environment, mitigating the problem of relying on static, potentially outdated graph snapshots. PuppyGraph users report 6-hop queries across billions of edges in less than 3 seconds.
- Scalable Performance: PuppyGraph’s distributed compute engine scales with your cluster size. Run petabyte-scale workloads and deep traversals like 10-hop neighbors, and get answers back in seconds. This exceptional query performance is achieved through the use of parallel processing and vectorized evaluation technology.
- Best of SQL and Graph: Because PuppyGraph queries your data in place, teams can use their existing SQL engines for tabular workloads and PuppyGraph for relationship-heavy analysis, all on the same source tables. No need to force every use case through a graph database or retrain teams on a new query language.
- Lower Total Cost of Ownership: Graph databases make you pay twice — once for pipelines, duplicated storage, and parallel governance, and again for the high-memory hardware needed to make them fast. PuppyGraph removes both costs by querying your lake directly with zero ETL and no second system to maintain. No massive RAM bills, no duplicated ACLs, and no extra infrastructure to secure.
- Flexible and Iterative Modeling: Using metadata driven schemas allows creating multiple graph views from the same underlying data. Models can be iterated upon quickly without rebuilding data pipelines, supporting agile analysis workflows.
- Standard Querying and Visualization: Support for standard graph query languages (openCypher, Gremlin) and integrated visualization tools helps analysts explore relationships intuitively and effectively.
- Proven at Enterprise Scale: PuppyGraph is already used by half of the top 20 cybersecurity companies, as well as engineering-driven enterprises like AMD and Coinbase. Whether it’s multi-hop security reasoning, asset intelligence, or deep relationship queries across massive datasets, these teams trust PuppyGraph to replace slow ETL pipelines and complex graph stacks with a simpler, faster architecture.

As data grows more complex, the most valuable insights often lie in how entities relate. PuppyGraph brings those insights to the surface, whether you’re modeling organizational networks, social introductions, fraud and cybersecurity graphs, or GraphRAG pipelines that trace knowledge provenance.
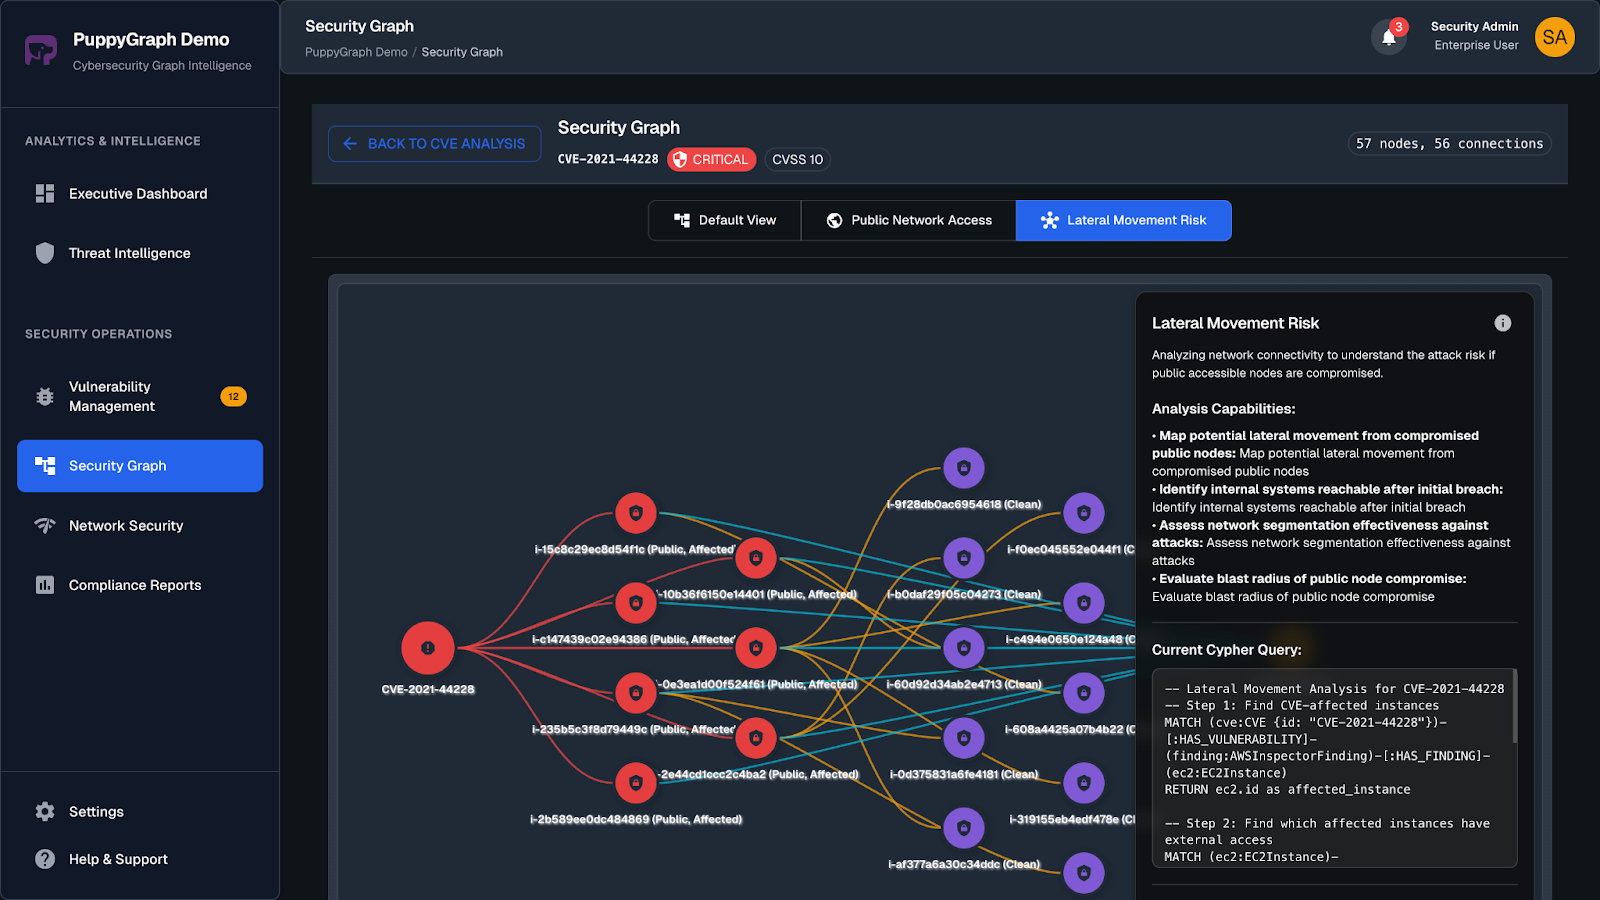
With PuppyGraph's support for Gremlin and openCypher, two expressive graph query languages ideal for modeling attacker behavior. Pattern matching, path finding, and grouping sequences become straightforward. These types of questions are difficult to express in SQL, but natural to ask in a graph:
- “Which over-privileged identities can indirectly reach a production database?”
- “What paths exist from a public S3 bucket to sensitive data assets?”
- “Which configurations allow lateral movement between cloud accounts?”
- “If this IAM role is compromised, what systems become reachable downstream?”
Getting started is quick. Most teams go from deploy to query in minutes. You can run PuppyGraph with Docker, AWS AMI, GCP Marketplace, or deploy it inside your VPC for full control. Interested in building a Wiz-like security graph? Read our step by step tutorial guide or check out these videos:
Conclusion
Exposure management works when you can see the whole picture, decide what matters, and land fixes that stick. Assets, identities, data, and controls connect in ways that either create openings or shut them down.
A unified graph makes that brings that context to the surface. Most security data already hints at relationships like who can reach what, under which permissions, and through which systems. The hard part is pulling those relationships out of scattered sources without slowing the work. PuppyGraph lets you query those connections directly so you can identify the meaningful fixes and verify they hold.
Ready to put this into practice? Get started with PuppyGraph Developer Edition to run graph queries against your own data, or book a demo to see how PuppyGraph can help improve your organization’s security posture.

Jaz Ku is a Solution Architect with a background in Computer Science and an interest in technical writing. She earned her Bachelor's degree from the University of San Francisco, where she did research involving Rust’s compiler infrastructure. Jaz enjoys the challenge of explaining complex ideas in a clear and straightforward way.

Get started with PuppyGraph!


Developer Edition
- Forever free
- Single noded
- Designed for proving your ideas
- Available via Docker install
Enterprise Edition
- 30-day free trial with full features
- Everything in developer edition & enterprise features
- Designed for production
- Available via AWS AMI & Docker install